

Naomi Vanderleest, Education Assistant
Lately, I have found myself looking up and noticing works that are hung from the ceiling at the Fort Wayne Museum of Art. Let’s take a closer look at one:

Museum purchase, 2018.295.1-.54. Image courtesy of FWMoA.
What strikes me first about this work is how the birds vary: they are hung at different lengths, strike multiple poses, and slightly sway and turn. All of these elements contribute to a narrative; I imagine these birds flying and diving, and I feel immersed in their movement. If these works weren’t suspended from the ceiling it wouldn’t have this effect. The choices an artist (and curator!) makes when displaying a work are important because they tell us how to interact with the artwork. Let’s look at another suspended artwork and see what changes:
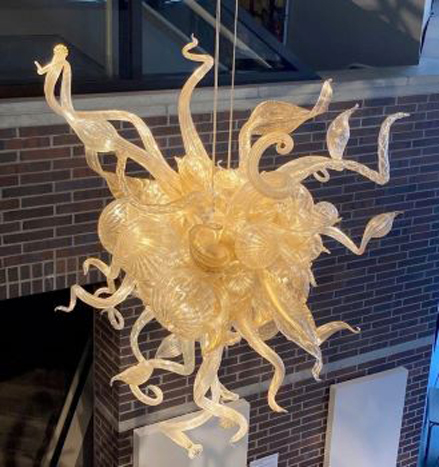
What is the first thing you think of when viewing this work? I think of warmth; its color reminds me the sun or a star. Having this work hung from the ceiling enforces its title, Lily Gold Chandelier. Even though this work doesn’t have a light fixture within in, but instead lights shine on it, where it is hung reminds me of a chandelier above a dining room table.
I am going to create my own hanging artwork, a mobile! To create your own you will need:
- 6 sheets of construction paper (various colors preferred)
- Scissors
- Tape
- Thread
- String or Yarn
- 2 pieces of cardboard cut into rectangles (about 12 inches by 1 inch)
- Pencil
First, cut a piece of string about 6 inches long and set it to the side. Next, cross two pieces of cardboard on top of each other to create an X-shape. Use the string you just cut to loosely wrap the two pieces of cardboard together (try creating another X on top), but don’t wrap them completely together yet. Feed the small piece of string underneath the wrapping and tie the two ends together, you’ll use this loop to hang your work. Now, continue wrapping until the cardboard pieces feel tightly bound together.

Cut the string and tuck it under the bottom so it doesn’t unravel. Next, cut 5 lengths of thread to hang from the cardboard. These pieces can be any length. I made a variety of lengths, my longest is 24 inches, but note that the longer you make the thread the higher you will want to hang the mobile. Attach the thread with tape to each corner of the cardboard and the last piece near the middle.
Now we can create the shapes that will hang from the mobile! Fold a piece of construction paper in half and draw a shape on one side. I created shapes that I saw at the museum! Cut out the shape to create two of each. TIP: to cover pencil lines, rearrange the shapes and bring the shape cut out from behind the drawing to the front. Use a rolled piece of tape to attach the shapes to the thread and put the other shape on top. (TIP: start attaching a shape to the end of the thread to hide it). TIP: Use multiple pieces of tape to help keep the shape from tilting, like this (note the pencil lines are on the “back” with the taped side):

Repeat these steps to attach multiple shapes to the mobile, using different colors and different sizes to fill the strings. TIP: Don’t make a shape that is more than 5 inches wide or long. It might be too large to hang on the thread!
Below is my finished mobile! Do you recognize any shapes from around the museum?

Where did you get your ideas for your mobile? Share your mobile with a friend and ask them what it reminds them of, they might be inspired to create their own!
Come to Second Saturday Family Tours at FWMoA to get ideas for your art! See the hanging work Tale of the Rainbow Crow in the exhibition Transformed Spaces: Art Beyond the Frame, which just opened on July 1st!