

Alyssa Dumire, Director of Children’s Education
Real, “serious” art can also be funny, especially in the hands of Red Grooms. Almost two years ago, we celebrated Scholastic Awards Alum Red Grooms’ birthday here on the blog, and for today’s Saturday Studio, we’re looking back at his sculptural silkscreen Gertrude to make our own silly paper sculptures.
So many artworks have taken on new meaning during this era of staying-at-home, and now when I look at Gertrude, I’m reminded of the feeling of sitting on my couch for so long that I become one with the furniture. Sound familiar? This long weekend, let’s make some art rather than be swallowed by our comfy chairs!
In past Saturday Studios, we’ve found materials from around our homes, and though today is no different, we’re also finding our subjects there. Many of us have probably grown a little weary of our surroundings, but creating art inspired by them can help us appreciate them with fresh eyes.
Here’s what we need:
- Paper
- Tape and/or glue
- Scissors
- Your favorite drawing or painting medium (colored pencils, markers, crayons…I used watercolors)
Choose your victims.
Select a piece of furniture and someone from around your house to recreate. I chose my dog, Addy, and the rocking chair that sits near my desk because I like the floral pattern and curved back. Both are subjects that I know very well and spend a lot of time with!

We need to first break down the three-dimensional chair into flat, 2D shapes on our paper. Take a good look at the chair from the front and sides (we’re not worried about the back), and observe the shapes of each side or plane. You’ll likely find that your chair is mostly made out of rectangles with a few added curves or corners cut. Some versions of Gertrude remain flat so we can get an idea of how Grooms broke down his chair and figure.
Decide which elements of your chair and subject are most important to capture. In the spirit of Grooms, we don’t need to worry about creating perfect likenesses of our sitters, but can choose characteristics to exaggerate and others that we might not include at all! I decided it would be too difficult to make the arms of my chair slope (though I did curve the ends). I definitely wanted to emphasize the floppy-ness of Addy’s ears.
Start with a maquette.
A maquette is a scale model and functions as a 3D sketch. We want to make sure we know how to construct our chair before we spend a lot of time decorating it and making it look nice. The maquette will also act as a template for our finished sculpture.

The finished template after I cut it apart and marked the location of the tabs. 

Draw a shape for the back of the seat in the upper middle of your paper. Now look down at the seat (the part you sit on), and draw that shape attached to the bottom edge of the back, and draw the front of the seat down below that. The arms will attach to the side of the seat. Look at each side of the arm and draw these shapes next to each other too. Maybe the arm of your chair is rounded and you don’t need separate shapes for the top and sides–it would then be one long rectangle that would curve down to the base of the chair once assembled.
You’ll notice that I only made one arm for my model. Why is that? My chair, like most, is symmetrical, so once I figured out how to make one side, I could just flip my template over and trace it on the other side too.
Cut out your template and fold along the lines. Use tape to hold it together as needed. Does it line up correctly? Mine did not at first; I ended up cutting off certain shapes and trying again until they all met at the correct angles. If you look closely at my maquette, you can see where the paper is pieced together as I revised the shape. Keep cutting and piecing until it fits together the way you like.
Draw the figure that will sit in or on your chair. You might not even need to make separate pieces for it! I drew my dog flat, but added a tab to her feet so she could be secured to the seat, and then attached additional tabs to her back and the chair back for extra support.
Paper can also be bent and curved. Red Grooms really exaggerated the curves of his chair, which I think add an extra element of humor. You can do the same if you like! I curled the arms of my chair and bent the back in a bit at the sides, and also added a bit of dimension to my dog.

Once you’re happy with your maquette, carefully cut the tape apart until your pattern lays flat. You don’t need to cut the whole thing apart–I think it’s easiest to keep it in as few separate pieces as possible, and was able to make my entire chair with one flat piece. As you cut it apart, mark the sides that should be taped together. For a more secure fit, you’ll want to add a tab to one edge at each seam.
Maquette to Final Sculpture

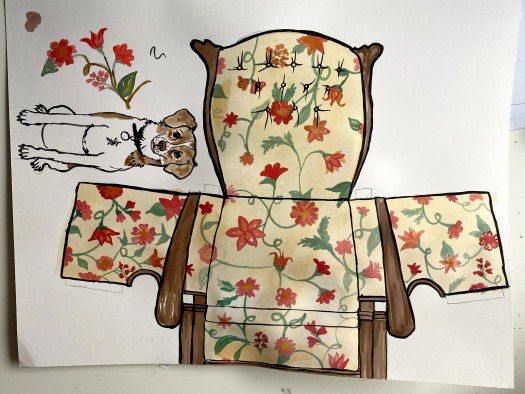
Trace your template on a new piece of paper or cardstock. See where I added the tabs? I also labeled each part of the chair, and marked the folds with dashed lines while the cut lines are solid.
Add color and detail to your chair and figure! To capture the cartoony feel of Grooms’ work, I added thick black outlines.
Cut, fold, assemble, and display!
Cutting around the smaller details with scissors gets a bit tricky with thicker paper (even for grown-up hands). An adult assistant with an exacto knife would have an easier time. Don’t rush the cutting step!


Finished! 
Finished!
Share your sculptures with us on our social media via Twitter, Facebook, Instagram, or here on the blog!
Very cute and well done. I always enjoy your posts on Twitter! Thank you for keeping us informed and amazed!
Thank you so much!