

Alyssa Dumire, Director of Children’s Education


It’s a mop! It’s a dress! It’s Claire Zeisler’s Stela I and it’s on view when FWMoA reopens on June 14!
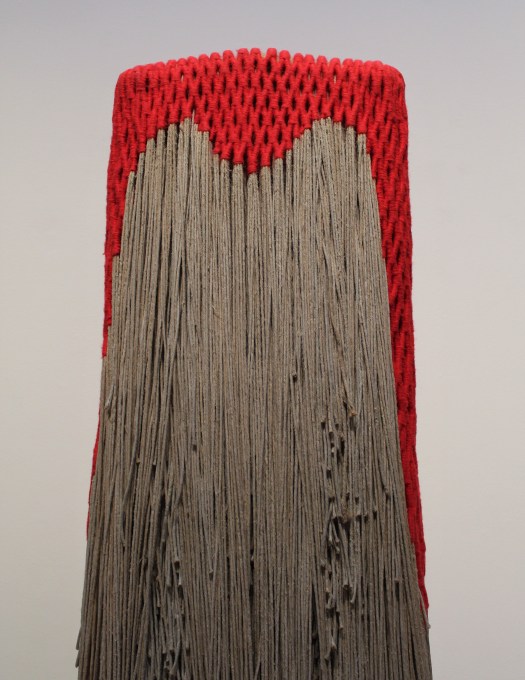
I remember first experiencing Stela I in an exhibition, Sculpture in the Twentieth Century, way back in 2015 when I was a FWMoA docent. Although it may remind us of a mop or an elegant gown, it is, of course, neither of those functional objects, but an abstract, fiber-based sculpture. Claire Zeisler began her career weaving on a loom but soon moved into three dimensions, creating large-scale, free-standing sculptures composed of knotted, woven, and braided fibers. Her trademark, as seen in Stele I, is the long, loose strands that are here allowed to pool on the pedestal, and she favored undyed or neutral-colored fiber. When she did use a color, it was usually red, also seen here. The simple, dramatic construction emphasizes the qualities of the materials, much like an abstract color-field painting. It is a powerful piece, and I hope you’ll come see it in person when we reopen!
Today, we’re making our own Claire Zeisler-inspired weaving using a cardboard loom. There is usually a classroom-sized loom among the interactives in our Learning Center. Weaving helps build fine-motor skills for early learners, is a great sensory activity, and can be adapted for any age. Using thicker yarn, ribbon, or strips of fabric is recommended for smaller hands, while older children and adults can experiment with more complex types of knots and patterns (there are a variety of resources online–we’re only getting into the basics here!).
SUPPLIES
An adult should cut:
- A rectangle of cardboard to serve as your loom. This will dictate the size of your finished weaving. Mine is about 6” x 8”.
- Two thin strips of cardboard the width of your loom.
You’ll also need:
- Thinner string, yarn, or twine to serve as your warp (more on this later)
- Yarn, twine, ribbon, or strips of fabric for weaving
- Scissors
- Tape
- A dowel or twig
- A plastic needle and/or weaving shuttle is nice to have, but not essential
PREPARE YOUR LOOM


Use scissors to cut evenly-spaced notches along the top edge of your cardboard. Mine were spaced about ½” apart and the same length. Count the number of notches, and cut the same along the bottom. You can use a ruler here to be extra-precise, but don’t need to. I ended up with 11 notches.
Glue your thin strips of cardboard just below where your notches stop. This will act as a spacer, making it easier to thread your weaving underneath. Let the glue dry.
The loom is complete!


Now, using your thinner thread or twine and leaving a tail, pull it into the first notch on the top, then down to the first notch on the bottom. Wrap it along the back of your loom, then repeat with the second set of notches. This should be fairly tight (but not so tight that it bends your loom). Continue across the entire loom, then cut the end and use tape to secure the tails on the back. These vertical threads that remain stationary during weaving are called the warp.
WEAVE!
Before you start, think about your design. Like Zeisler, consider keeping your colors minimal and design simple. I chose natural-colored twine and yarn to match (yarn makes nicer fringe than twine), plus a vibrant red since I had it, just like in Stele I. Think about the impact of your color choices and the meaning they might add to your work. I also knew that I wanted the color focused at the top with a long fringe of the natural fibers.


Start weaving! Cut a length of your first color and pass it under the first warp thread, then over the next, then under, over, under, over…until you reach the end of the row. This “live” thread is the weft. Take it back across the row of weft threads, this time going under where you went over before and vise versa. After you weave each row, gently push the weft up so it fits snugly against the previous row. Keep the thread tight, but not so tight that it pulls in the sides of your rectangle–they should stay as straight and parallel as possible. Continue until you use up the strand you cut, making sure to leave a tail. We’ll deal with these tails later.
Now, you can weave your entire loom like this, switching colors and adding more thread as needed, but here are some simple ways to add interest to your design:


Add fringe to the sides by weaving each row with a separate piece of yarn.


Add shapes to your design simply by not weaving across all of the warp threads. I brought my red section to a point in the middle and left the ends of each row loose, because I thought I would like the effect of the fringe in the middle (I later changed my mind and pulled these to the back). When you add your second color, weave a straight row across the bottom point, then fill in the triangles on either side. Be sure to weave onto the same warp threads (see photos) to avoid gaps in your design.


Add a row of fringe at any point. Cut a few strands of yarn, double the length you want your fringe to be. The more strands, the fuller your fringe! Keeping them all together, bring them under two warp threads, then adjust the ends to make sure they’re even. Pull the bar of thread between the warps to form a loop, then reach through the loop from the bottom and pull the ends through. Pull to tighten. I found that the twine on its own is a bit stiff to make nice fringe, so I mixed it in with some softer, thicker yarn.
Anytime you add a row of fringe, it helps to have at least a couple rows of plain weaving above and below to stabilize it.

Keep going until your whole loom is filled. Mine looked pretty messy at this stage!
FINISHING YOUR WEAVING


Flip your loom over and slip some scissors under the warp. Cut all the way across. Your weaving will still be held in place by the notches.
Pull the warp threads out of the notches along the top, then knot two of them together at a time. Since I had an odd number, I knotted the three in the middle together. This will secure your weft threads in place as well.

Tie these around a stick or dowel to stabilize it for hanging. If you have a needle big enough, you can instead thread the knotted warp threads through the back of your weaving for a neater finish. Add a loop to the top for hanging.

Repeat the knotting with the bottom warp threads (mine are totally hidden by fringe, but this is still important to keep the weft from slipping!).
Now, you probably have some loose ends where you added thread! These can be tied to the nearest warp thread, making sure to bring your knot to the back to hide it. Trim the ends.
Trim your fringe as desired.


Display your work! Share your finished creations with us online here at the blog or tag us on social media: Facebook, Instagram, Twitter.
One Reply to “”